11-15
0
小米CR660x系列 SN转码
#!/usr/bin/env
<?php
//路由器固件解包后,从 /bin/mkxqimage 中提取的盐
$salt = array(
    'r1d' => 'A2E371B0-B34B-48A5-8C40-A7133F3B5D88',
    'others' => 'd44fb0960aa0-a5e6-4a30-250f-6d2df50a'
);

isset($argv[1]) or die('Usage: ' . $argv[0] . " SN\n");
print_line(get_passwd($argv[1]));
// 微信🈲
function print_line($message) {
    echo $message . "\n";
}

//密码算法:
//原始 SN 拼接反转后的盐,做 md5 运算取前 8 个字符
function get_passwd($sn) {
    return substr(md5($sn . get_salt($sn)), 0, 8);
}

// SN 中不含 '/' 则为 r1d
function get_salt($sn) {
    global $salt;
    if (false === strpos($sn, '/')) {
        return $salt['r1d'];
    } else {
        return swap_salt($salt['others']);
    }
}

//非 R1D 盐要反转后才能使用
function swap_salt($salt) {
    return implode('-', array_reverse(explode('-', $salt)));
}
05-14
0
排序方法
1.插入排序
void InsertSort(int* arr, int n)
{
	for (int i = 0; i < n - 1; ++i)
	{
		//记录有序序列最后一个元素的下标
		int end = i;
		//待插入的元素
		int tem = arr[end + 1];
		//单趟排
		while (end >= 0)
		{
			//比插入的数大就向后移
			if (tem < arr[end])
			{
				arr[end + 1] = arr[end];
				end--;
			}
			//比插入的数小,跳出循环
			else
			{
				break;
			}
		}
		//tem放到比插入的数小的数的后面
		arr[end  + 1] = tem;
		//代码执行到此位置有两种情况:
		//1.待插入元素找到应插入位置(break跳出循环到此)
		//2.待插入元素比当前有序序列中的所有元素都小(while循环结束后到此)
	}
}
2.希尔排序
//希尔排序
void ShellSort(int* arr, int n)
{
	int gap = n;
	while (gap>1)
	{
		//每次对gap折半操作
		gap = gap / 2;
		//单趟排序
		for (int i = 0; i < n - gap; ++i)
		{
			int end = i;
			int tem = arr[end + gap];
			while (end >= 0)
			{
				if (tem < arr[end])
				{
					arr[end + gap] = arr[end];
					end -= gap;
				}
				else
				{
					break;
				}
			}
			arr[end + gap] = tem;
		}
	}
}
3.选择排序
//选择排序
void swap(int* a, int* b)
{
	int tem = *a;
	*a = *b;
	*b = tem;
}
void SelectSort(int* arr, int n)
{
	//保存参与单趟排序的第一个数和最后一个数的下标
	int begin = 0, end = n - 1;
	while (begin < end)
	{
		//保存最大值的下标
		int maxi = begin;
		//保存最小值的下标
		int mini = begin;
		//找出最大值和最小值的下标
		for (int i = begin; i <= end; ++i)
		{
			if (arr[i] < arr[mini])
			{
				mini = i;
			}
			if (arr[i] > arr[maxi])
			{
				maxi = i;
			}
		}
		//最小值放在序列开头
		swap(&arr[mini], &arr[begin]);
		//防止最大的数在begin位置被换走
		if (begin == maxi)
		{
			maxi = mini;
		}
		//最大值放在序列结尾
		swap(&arr[maxi], &arr[end]);
		++begin;
		--end;
	}
}
4.冒泡排序
//冒泡排序
void BubbleSort(int* arr, int n)
{
	int end = n;
	while (end)
	{
		int flag = 0;
		for (int i = 1; i < end; ++i)
		{
			if (arr[i - 1] > arr[i])
			{
				int tem = arr[i];
				arr[i] = arr[i - 1];
				arr[i - 1] = tem;
				flag = 1;
			}
		}
		if (flag == 0)
		{
			break;
		}
		--end;
	}
}
5.hoare版本(左右指针法)
//快速排序   hoare版本(左右指针法)
void QuickSort(int* arr, int begin, int end)
{
	//只有一个数或区间不存在
	if (begin >= end)
		return;
	int left = begin;
	int right = end;
	//选左边为key
	int keyi = begin;
	while (begin < end)
	{
		//右边选小   等号防止和key值相等    防止顺序begin和end越界
		while (arr[end] >= arr[keyi] && begin < end)
		{
			--end;
		}
		//左边选大
		while (arr[begin] <= arr[keyi] && begin < end)
		{
			++begin;
		}
		//小的换到右边,大的换到左边
		swap(&arr[begin], &arr[end]);
	}
	swap(&arr[keyi], &arr[end]);
	keyi = end;
	//[left,keyi-1]keyi[keyi+1,right]
	QuickSort(arr, left, keyi - 1);
	QuickSort(arr,keyi + 1,right);
}
5.2挖坑法
//快速排序法  挖坑法
void QuickSort1(int* arr, int begin, int end)
{
	if (begin >= end)
		return;
	int left = begin,right = end;
	int key = arr[begin];
	while (begin < end)
	{
		//找小
		while (arr[end] >= key && begin < end)
		{
			--end;
		}
		//小的放到左边的坑里
		arr[begin] = arr[end];
		//找大
		while (arr[begin] <= key && begin < end)
		{
			++begin;
		}
		//大的放到右边的坑里
		arr[end] = arr[begin];
	}
	arr[begin] = key;
	int keyi = begin;
	//[left,keyi-1]keyi[keyi+1,right]
	QuickSort1(arr, left, keyi - 1);
	QuickSort1(arr, keyi + 1, right);
}
5.3前后指针法
//快速排序法  前后指针版本
void QuickSort2(int* arr, int begin, int end)
{
	if (begin >= end)
		return;
	int cur = begin, prev = begin - 1;
	int keyi = end;
	while (cur != keyi)
	{
		if (arr[cur] < arr[keyi] && ++prev != cur)
		{
			swap(&arr[cur], &arr[prev]);
		}
		++cur;
	}
	swap(&arr[++prev],&arr[keyi]);
	keyi = prev;
	//[begin,keyi -1]keyi[keyi+1,end]
	QuickSort2(arr, begin, keyi - 1);
	QuickSort2(arr, keyi + 1, end);

}
05-12
0
Cloudreve
一.官网链接
二.开机启动
[Unit]
Description=Cloudreve
Documentation=https://docs.cloudreve.org
After=network.target
After=mysqld.service
Wants=network.target

[Service]
WorkingDirectory=/www/wwwroot/cloud.aqrboyblog.top
ExecStart=/www/wwwroot/cloud.aqrboyblog.top/cloudreve
Restart=on-abnormal
RestartSec=5s
KillMode=mixed

StandardOutput=null
StandardError=syslog

[Install]
WantedBy=multi-user.target
三.常用命令
# 更新配置
systemctl daemon-reload

# 启动服务
systemctl start cloudreve

# 设置开机启动
systemctl enable cloudreve

# 启动服务
systemctl start cloudreve

# 停止服务
systemctl stop cloudreve

# 重启服务
systemctl restart cloudreve

# 查看状态
systemctl status cloudreve05-08
0
小米CR660x系列 固刷 openwrt
1.路由器降级
1.高于 1.0.103 版进行降级 路由后端
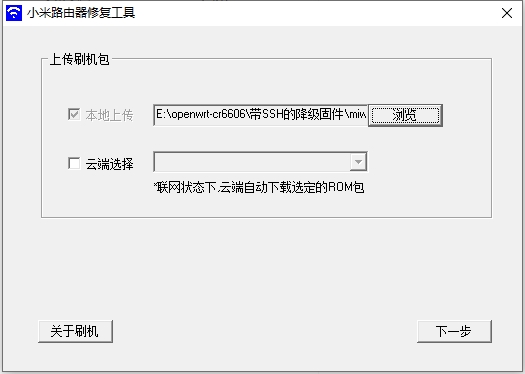
2.MIWIFIRepairTool 工具 执行操作

进度条跑完后,等待路由器指示灯变为蓝色闪烁,然后断开路由器电源,再等待至少十秒接入电源,正常启动后就是已降级的了。
2.开启SSH
- 利用openwrt已经装好的路由器 设置 lan口 ip 为169.254.31.1 WiFi密码 12345678 关闭DHCP
- 将xqsystem.lua 文件复制到OpenWrt的/usr/lib/lua/luci/controller/admin/目录下
- 用WinSCP拷贝,或者虚拟机共享目录直接拷贝都可以,然后访问http://169.254.31.1/cgi-bin/luci/api/xqsystem/token测试是否配置成功,如果显示一串Json串,最后含有”code”:0字样,即为成功。
- 断开openwrt连接,现在连接cr6606路由器登陆路由主页面,看地址栏,找到stok字样,就像下面这样的
- 连接wifi http://192.168.31.1/cgi-bin/luci/;stok=057ef4dbc23ee4e1215cb9b6e982b918/api/misystem/extendwifi_connect?ssid=OpenWrt&password=12345678
- 开启ssh http://192.168.31.1/cgi-bin/luci/;stok=057ef4dbc23ee4e1215cb9b6e982b918/api/xqsystem/oneclick_get_remote_token?username=xxx&password=xxx&nonce=xxx
- 使用winscp通过SSH登录路由器上传pb-boot.img文件到/tmp/目录下 执行mtd write /tmp/pb-boot.img Bootloader命令
- 拔掉路由器电源,插针reset再插电,配置电脑固定ip为192.168.1.2,然后访问192.168.1.1,即访问到PandoraBox界面,这里可以刷入bread,选择文件之后,点击恢复固件,等待重启
- 重启后进入Breed,选固件更新刷入Bootloader-CR6608.bin
注意
提示1646的检查下第一步的DHCP是否关闭
提示1619的检查第一步IP是否设置正确或者(Y)下仍有其他设备
提示1655的再来一次,有小概率会连接失败。
3.写入 OpenWRT
scp breed-mt7621-xiaomi-r3g.bin root@192.168.2.1:/tmp/
mtd write breed-mt7621-xiaomi-r3g.bin Bootloader
1.在 Breed “固件更新”界面上, 在固件栏, 选择从 OpenWRT 下载的 kernel.bin 包写入. 待其重启, 这一步写入后, 路由器上就有基础的OpenWRT系统, 但是文件系统还没初始化, 做任何设置都不会保存.
重启后在电脑获得IP后(默认是192.168.1.1), 访问 http://192.168.1.1 可以进入 OpenWRT 界面(口令为空), 在 OpenWRT 界面上会提示仅有基本文件系统需要升级System running in recovery (initramfs) mode., 到升级界面, 选择结尾为 sysupgrade.bin 的固件升级, 重启后就升级完成了.
2.安装 中文包
opkg install luci-i18n-base-zh-cn3.安装 OpenClash
opkg update
opkg install bash iptables dnsmasq-full curl ca-bundle ipset ip-full iptables-mod-tproxy iptables-mod-extra ruby ruby-yaml kmod-tun kmod-inet-diag unzip luci-compat luci luci-base
opkg install /tmp/openclash.ipk
4.配置openwrt
设置OpenWrt的访问端口
vi /etc/config/uhttpd代码区域
config uhttpd 'main'
list listen_http '0.0.0.0:80'
list listen_http '[::]:80'
list listen_https '0.0.0.0:443'
list listen_https '[::]:443'
改为
config uhttpd 'main'
list listen_http '0.0.0.0:8080'
list listen_http '[::]:8080'
list listen_https '0.0.0.0:443' # 如果不需要HTTPS,也可以修改或删除此行
list listen_https '[::]:443' # 如果不需要HTTPS,也可以修改或删除此行重启uHTTPd服务以使更改生效
/etc/init.d/uhttpd restart
service uhttpd restart
